Miro
Miro is a free virtual whiteboard platform that supports collaboration, interaction and feedback.
What is Miro?
Miro is a free whiteboard platform that is ideal for administering collaborative work in online classroom settings. On this page, you will find steps to assist in setting up a Miro board to best suit varied styles of online teaching as well as basic interface navigation basics.
When to use Miro
The flexibility of the Miro interface allows for a large range of tasks to be performed through the platform. As a live visualization tool, tutorial activities such as mind-mapping and quick diagramming are easy benefits to encouraging participation in online settings, while the ease of accessibility and file sharing capabilities may appropriately substitute studio pin-up culture.
Some instance where the use of Miro is encouraged include:
- Studios
- Tutorial activities
- Remote collaborations
- Moderation
Considerations when using Miro
Access
Access to boards are given by link sharing or by email invites. It is not necessary for users to have a Miro account to view boards if permissions are given by the board creator. However, both editing permission and an account is required to edit boards.
You can access a Miro board with guidance on Miro board management via the button below.
BEL+T's Guide to Miro Board Management.
Privacy
All boards are public unless on Team, Education, Business, and Enterprise plans, in which private boards may be created.
This means that once a user is given access to a board, they will have access to all other boards from the same ‘Team’ collaboration. For staff members using the Miro for moderation or marking purposes, consider applying for the Educational license early and consult your subject coordinator for guidance on appropriate privacy measures.
The Education license will enable features such as password enabling for public boards, and unlimited board creation within a Team.
Users
There are no caps on the number of users allowed to access each board, however, consider that a greater number of users may produce some strain on the site and lags may occur.
File Sizes
There are no caps on the file sizes uploaded to each board, however, consider that greater size of data may produce some strain on the site and lags may occur. Encourage board participants to keep their file data at a maximum of (e.g. 10Mb per file) when sharing their work.
Account and Accessibility
While Miro is available as a free platform, it is not yet integrated into the Canvas or ABP system, and some limitations may be found to encourage the buying of a subscription-based upgrade.
Depending on the frequency of use, free access to Miro may be sufficient for most users (max. 3 boards).
| Free Account | Educational License |
|---|---|
|
|
*On the free plan, only the three most recently created boards are available to edit at a time. Older boards will be saved to the account as only ‘viewable boards’ and activated again only by deleting unnecessary active boards or by upgrading the account.
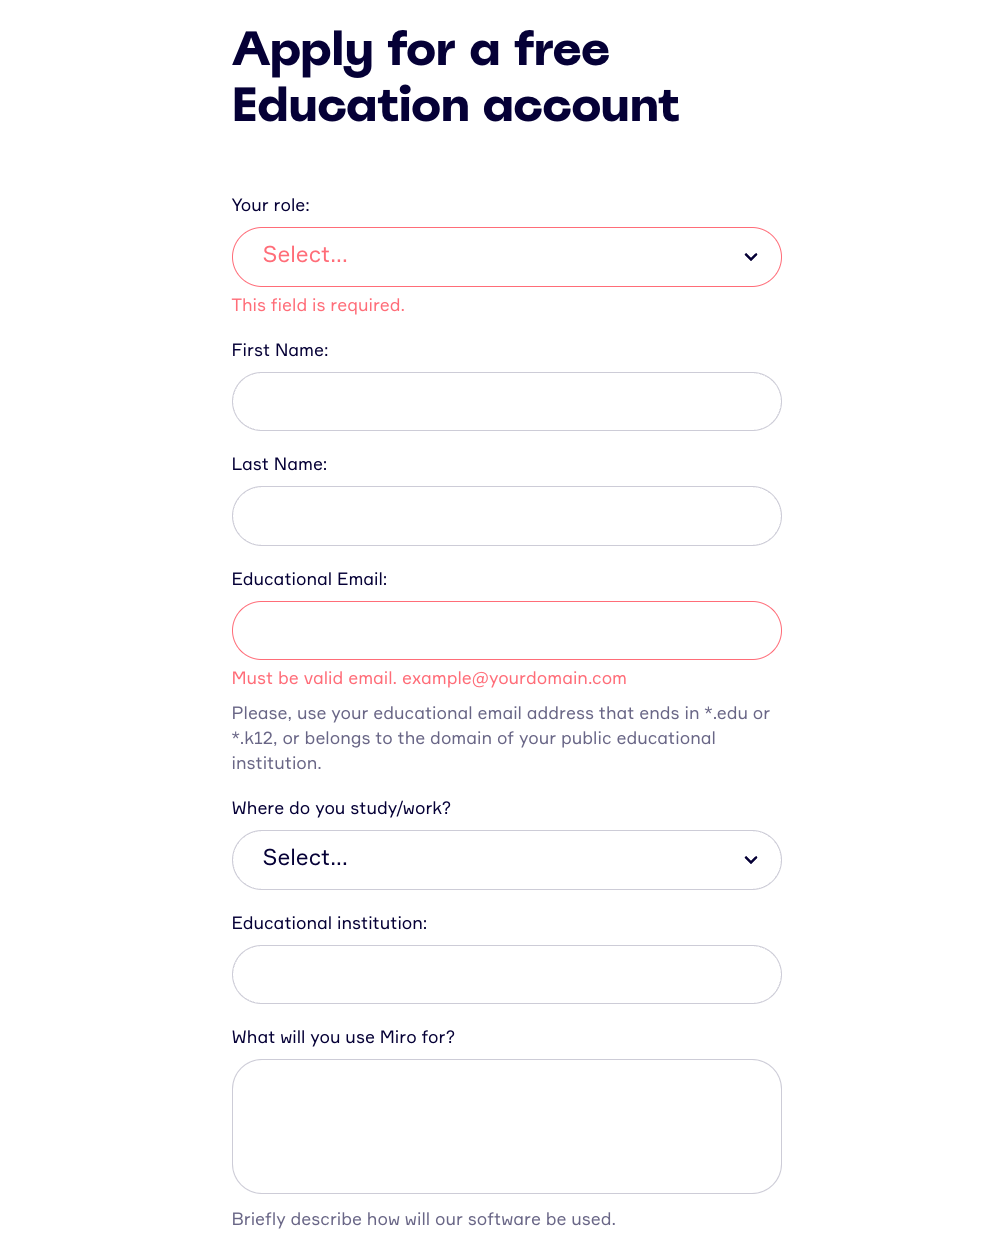
Applying for an Educational License
Students and staff can access an educational license by using their university-provided email when creating an account.
To request access to an [individual] educational license, students and staff may apply following the link below:
https://miro.com/contact/education/
The form asks for a URL to a web page that validates your student or employment status. For this section, please use the University's homepage URL (https://www.unimelb.edu.au/).
Application form (screenshot):
Privacy Settings in Miro
All boards are public unless on Team, Education, Business, and Enterprise plans, in which private boards may be created.
This means that once a user is given access to a board, they will have access to all other boards from the same ‘Team’ collaboration. Some important things to consider may be:
- Accessibility of boards for unintended students across year-levels and subjects.
- Staff members using the Miro for moderation or marking purposes, consider applying for the Educational license early and consult your subject coordinator for guidance on appropriate privacy measures.
This section will discuss some methods to ensure content remains visible only for its intended participants.
Option 1. Password Protection for Public Boards
Only available for Team, Business, Enterprise and Education plans.
1. When you enable access for Anyone with a link (Public access), click on the Set password button, enter a secure password (8+ symbols), and press Set. The password will be copied to your clipboard.
2. When the password is set, all guest users have to submit a password to open a protected board. Users don't have to re-enter the password for 72-hours.
Option 2. Board + Teams Management
On the Education plan, up to 2 Teams may be created per account. Work with one of these teams as a 'private' contents team, and migrate board content when necessary.
Option 3. Manually Manage Users Access
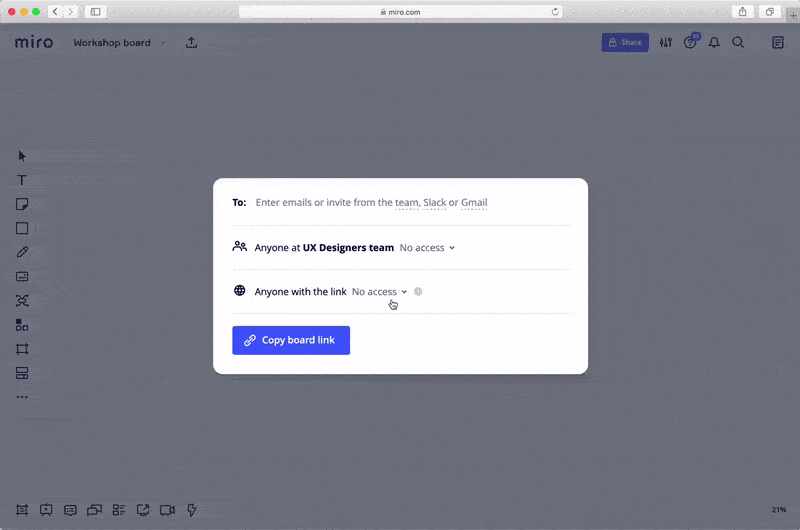
To edit access rights of existing collaborators as a board owner:
- Click on the Share button in the top-right corner,
- Choose Manage Settings. You will see the list of people who have access to the board. The Manage Settings button appears if there are some specific users invited to the board via email/Gmail/Slack.
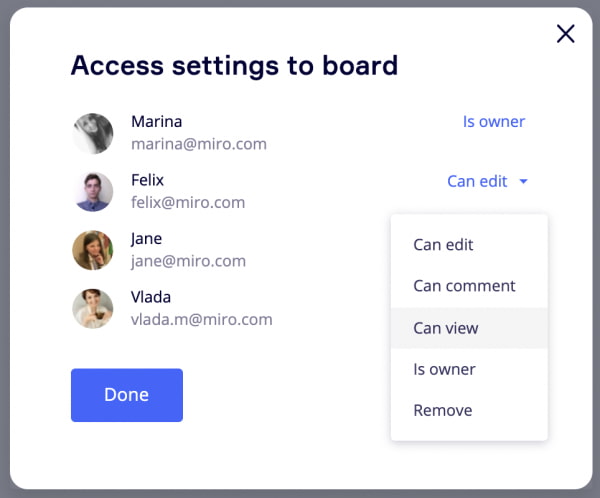
- Specify access rights for a chosen user by clicking on the drop-down lists which state their current access rights. Here you can also remove collaborators. The board owner will also see the option to make another user the owner of the board (thus signing away the ownership)
- Confirm the change by clicking Done.
Miro Interface
Boards
Interactive whiteboard space.
On the free plan, only the three most recently created boards are available to edit at a time. Older boards will be saved to the account as only ‘viewable boards’ and activated again only by deleting unnecessary active boards or by upgrading the account. An unlimited number of boards may be created and available on the educational license.
Accessible by all team members unless upgraded to create private boards.
Teams
Collaborate with a specified team. Only invited members may access the set of boards created within a team group.
On the free plan, individuals can only create one ‘Team’. When approved for the educational license, a second 'Team' will automatically be created by Miro with the capability to create unlimited boards.
Creating more 'Teams' is only available in upgraded plans.
Projects
Only available in upgraded plans. Created inside a Team to organise boards into folders.
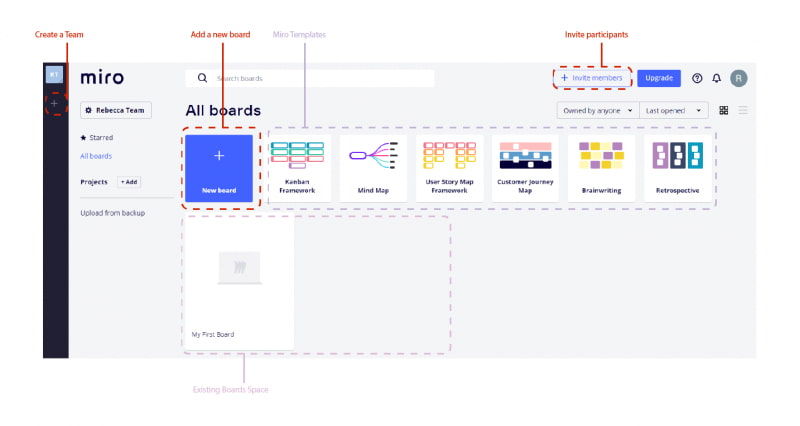
Setting Up a Miro Board
Step 1. Start
- Create a [+] new board.
- Choose a Miro template, OR start with an empty board, OR copy & paste a BEL+T template.
Step 2. Interface
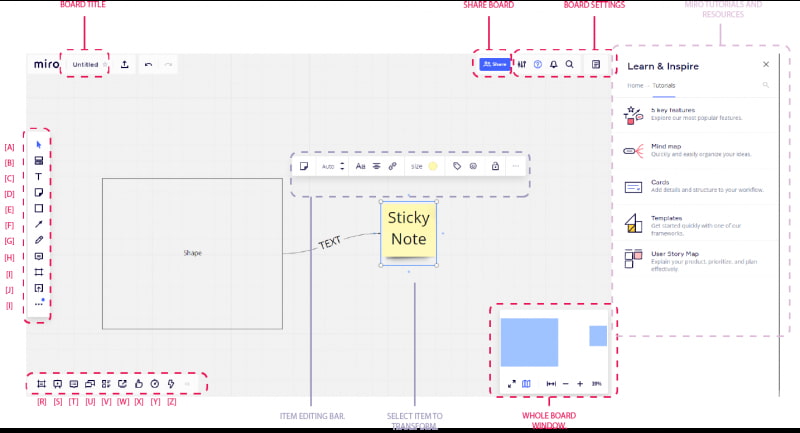
| [A] | Select (V) | [G] | Pen |
|---|---|---|---|
| [B] | Templates | [H] | Comment |
| [C] | Text | [I] | *Frame |
| [D] | Sticky Note | [J] | Upload |
| [E] | Shapes | [I] | Apps |
| [F] | Connection Line (between items) |
| [R] | Frames | [W] | Screen Sharing |
|---|---|---|---|
| [S] | Presentation Mode | [X] | Voting |
| [T] | Comments | [Y] | Timer |
| [U] | Chat | [Z]* | Activity |
| [V] | Cards |
Step 3. Navigation
| Mouse [left click] | Pan |
|---|---|
| Shift + Mouse [left click] | Select items collectively by dragging the box over to highlight them. |
| Mouse [scroll] | Zoom |
| Alt + Click Object [left lick] + Drag | Copy object |
*Tips & Tricks
[I] Frame - Frames are essential to structure your content on the board and manage the big picture. You can move frames collectively with its content when working in them. They are also helpful for creating presentations or exporting content.
[Z] Activity - Activity List allows for tracking and evaluating the input that every teammate adds to your projects. No matter what access rights you have on the board, you can always check the latest changes made to it through the Activity list.
Accessibility
Screen reader users
Screen reader users cannot create or edit content in Miro, but they can view content if it is correctly structured. You can add structure to your Miro board by:
- Placing all content within frames
- Giving frames meaningful titles
- Create frames from left to right
- Frames should fit the browser at 100% Miro zoom
- Placing content in frames, sticky notes, shapes, emojis, text and comments. Only these objects are read out by screen readers
- Provide text alternatives for all images using the text or shape objects.
To check the frame sequence, press R on the keyboard to view the frames list.
Low vision users
Users with low vision can have difficulty seeing the outline of frames. Use a solid background colour for frames, or a dark keyline, to provide contrast against the grey background.
Neurodiverse users
If you are facilitating a session using Miro, consider having all users see the same content as you, by clicking on your avatar and selecting 'Bring everyone to me'. Alternatively, you could choose to have selected users follow your content, by clicking on your avatar and selecting 'Bring to me'. Seeing the cursors of other collaborators can be very distracting. You can hide cursors by clicking on the mouse cursor symbol, in the collaboration toolbar.
Easy Access
If you make your board available to visitors, users can access the board without having to sign in. To enable visitor access click on Share > Anyone with the link can view.
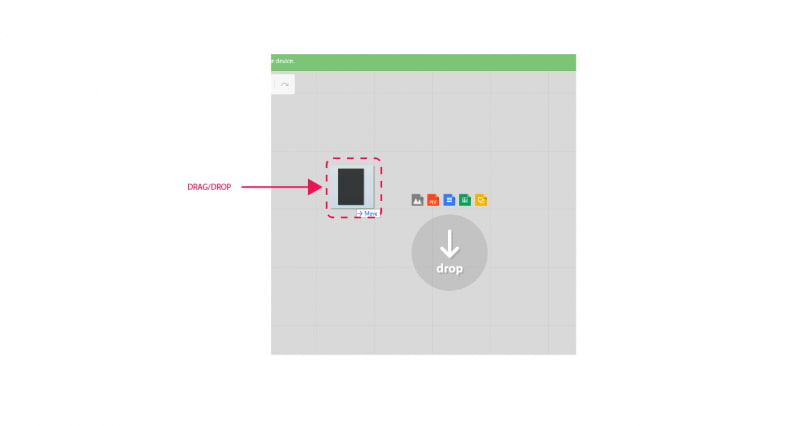
Uploading Content into Miro
Images | PDF | Docs | Spreadsheets | Presentation
Option 1. Copy and Paste
- Copy (Ctrl + C) from a source and
- Paste (Ctrl + V) into your Miro Board.
Option 2. Drag and Drop
- Drag your desired image/video/document/excel/pdf into the Miro board frame and drop.
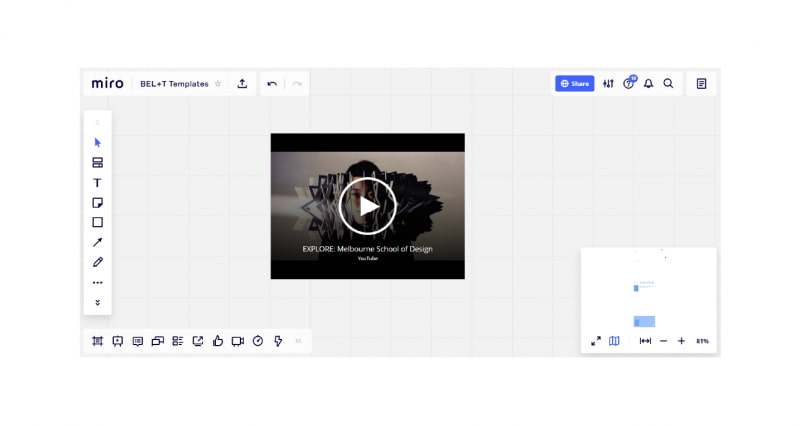
Embedding YouTube Videos
- Open the video to embed in Youtube and right click the frame to find <> Copy embed code.
- Enter your Miro board and select the […] at the bottom of the left hand tools menu to open the app Paste iFrame code.
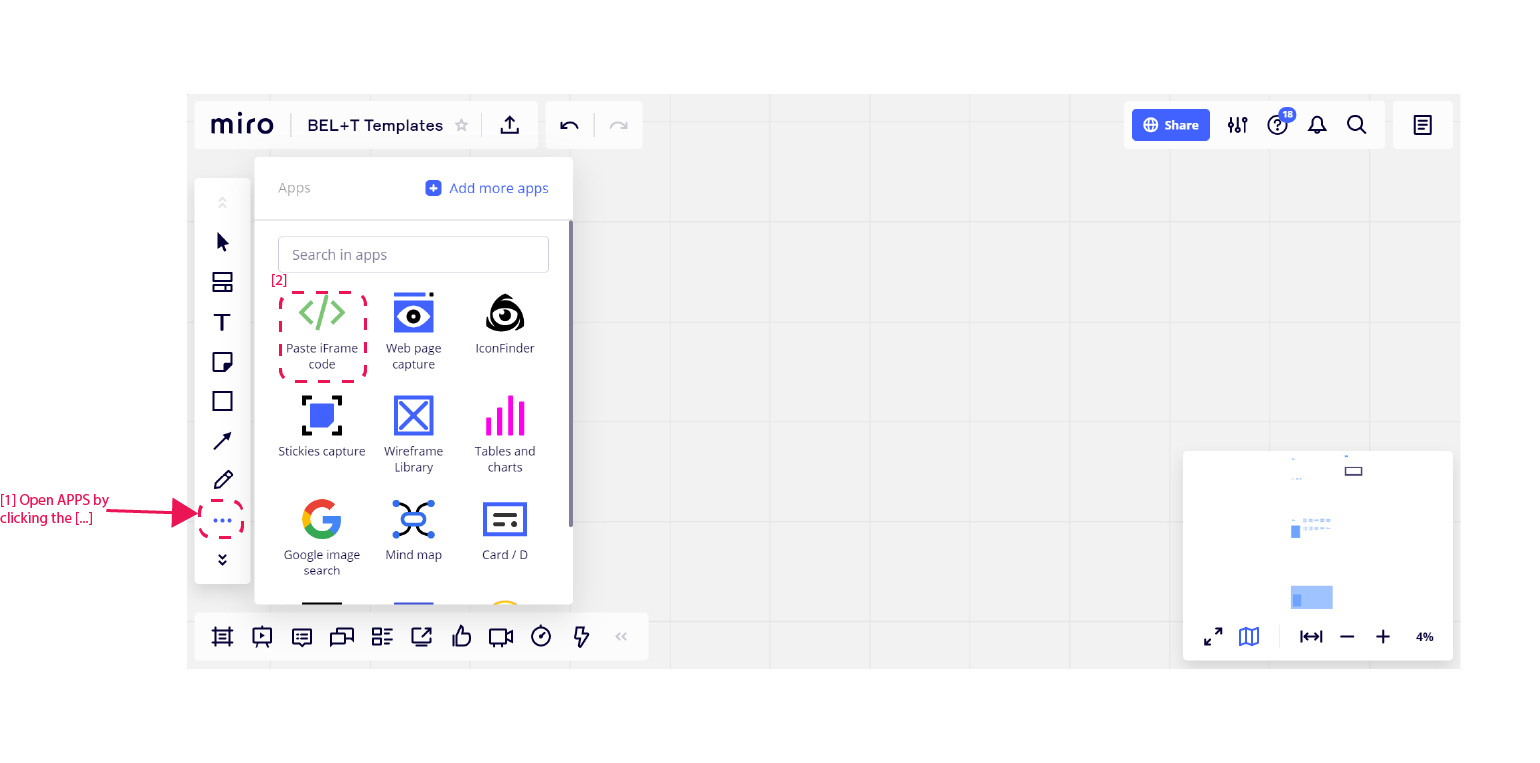
3. Paste in the code, [Ctrl + V] and click embed.
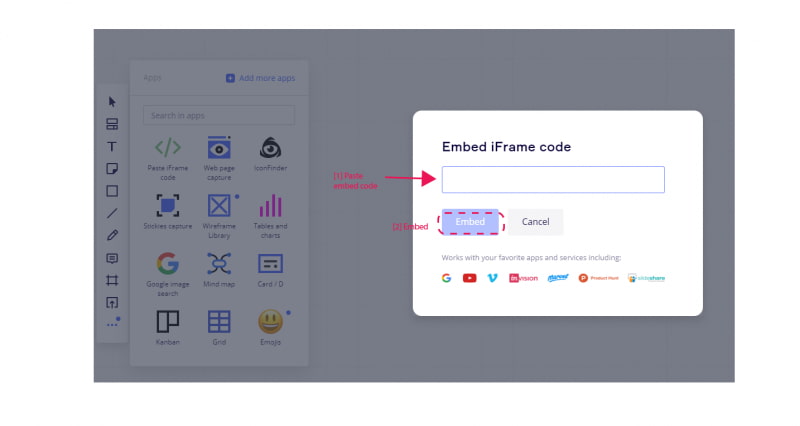
4. Play your video.
BEL+T Miro Templates
The BEL+T team has created a set of Miro templates and guidance for academics and educators to access, as a starting point for Miro collaborations. These templates may be applied for use in:
- Classroom interaction
- Moderation (access granted on request)
You can access the Miro board containing templates and guidance for classroom interaction via the button below. To access the moderation Miro board, please email abp-belt@unimelb.edu.au.
Copying the Template
- Email abp-belt@unimelb.edu.au to request access to edit the Miro board.
- Enter the BEL+T Template board.
- Select the necessary template contents by holding ‘Shift’ to drag and select.
- Copy the necessary template frame (Ctrl + C)
- Enter your board and paste (Ctrl + V)